Monday, 12 September 2011

jQuery Content Filter

The Content Filter filters the Dom Elements according to the content. Given below the types of content filters 

Given below the types of content filters :


: contains() Selector
It filters the elements which have the matched text.
Example :
<script>$("div:contains('Ankit')").css("text-decoration", "underline");</script>

It filters the div which have 'Ankit' as text and underline them.

: empty Selector It filters the elements which are empty. Here empty means they don't have children or text.
Example :
<script>$("td:empty").text("Was empty!").css('background', 'rgb(255,220,200)');</script>

It filters all the 'td' element which don't have any child or text and fill it with text "Was empty" and change it's background color.

:has() Selector
It filters the elements which contains the element provided to ' has() '.
Example :
<script>$("div:has(p)").addClass("test");</script>

It filters all the 'div' elements which have 'p' (paragraph) inside it and add the css class 'test' to it.

: parent Selector
It selects all the elements that have at least one child including text .

Example :
 
<!DOCTYPE html>
<html>
<head>
<style>
td { width:40px; background:green; }
</style>
<script src="jquery-1.4.2.js"></script>
</head>
<body>
<table border="1">

<tr><td>Ankit</td><td></td></tr>
<tr><td>Vinita</td><td></td></tr>

</table>
<script>$("td:parent").fadeTo(1500, 0.3);</script>
</body>
</html>

Output :


jQuery Visibility Filter

This filter filters the element according to their visibility. Means it filters by either hidden or visible

Properties:


: hidden Selector
It filters all the element that are hidden .

Example :

<!DOCTYPE html>
<html>
<head>
<style>
div { width:70px; height:40px; background:#ee77ff; margin:5px; float:left; }
span { display:block; clear:left; color:red; }
.starthidden { display:none; }
</style>
<script src="jquery-1.4.2.js"></script>
</head>
<body>
<span></span>
<div></div>
<div style="display:none;">It was hidden! appears for 3000ms</div>
<div></div>
<div class="starthidden">It was Hidden! appears for 3000ms</div>
<div></div>
<form>
<input type="hidden" />
</form>
<span>
</span>
<script>
// in some browsers :hidden includes head, title, script, etc... so limit to body
$("span:first").text("Found " + $(":hidden", document.body).length +
" hidden elements total.");
$("div:hidden").show(3000);
$("span:last").text("Found " + $("input:hidden").length + " hidden inputs.");
</script>
</body>
</html>
Output :


: visible Selector
It filters all the elements that are visible .

Example :
 
<!DOCTYPE html>
<html>
<head>
<style>
div { width:50px; height:40px; margin:5px; border:3px outset green; float:left; }
.starthidden { display:none; }
</style>
<script src="jquery-1.4.2.js"></script>
</head>
<body>
<button>Show hidden to see they don't change</button>
<div></div>
<div class="starthidden"></div>
<div></div>

<div></div>
<div style="display:none;"></div>
<script>
$("div:visible").click(function () {
$(this).css("background", "yellow");
});
$("button").click(function () {
$("div:hidden").show("fast");
});

</script>
</body>
</html>

 Output : 

After execution :

After clicking each box :

 After clicking button :

jQuery Child Filter

Child filter basically handles filtration according to parent-child relationship 
Some main Child filters are given below :

: first-child Selector

It filters all the elements which are first child of their parent.
Example :
$("div span: first-child").css("text-decoration", "underline")
It filters the first span of each matched div.

: last-child Selector

It filters all the elements which are last child of their parent.
Example :
$("div span: last-child").css({color:"red", fontSize:"80%"})
It filters the last span of each matched div.

: nth-child Selector

It filters all the elements which are nth child of their parent.

Example : (nthChildSelector.html)

<!DOCTYPE html>
<html>
<head>
<style>

div { float:left; }
span { color:blue; }
</style>
<script src="jquery-1.4.2.js"></script>
</head>
<body>
<div><ul>
<li>Ankit</li>
<li>Ravi</li>
<li>Bharat</li>

</ul></div>
<div><ul>
<li>Satya Prakash</li>
</ul></div>

<div><ul>
<li>Gyan</li>
<li>Neha</li>
<li>Bikrant</li>
<li>Anushmita</li>
</ul></div>
<script>$("ul li:nth-child(2)").append("<span> - 2nd!</span>");</script>
</body>
</html>

Output :


Finds the second li in each matched ul and notes it.

: only-child Selector

It filters all the elements which are only child of their parent.

Example : (onlyChildSelector.html)

<!DOCTYPE html>
<html>
<head>
<style>

div { width:100px; height:80px; margin:5px; float:left; background:#b9e }
</style>
<script src="jquery-1.4.2.js"></script>
</head>
<body>
<div>
<button>Sibling!</button>
</div>

<div>
<button>Sibling!</button>
</div>
<div>
None
</div>

<div>
<button>Sibling!</button>

</div>
<div>
<button>Sibling!</button>
</div>
<script>$("div button:only-child").text("Alone").css("border", "2px blue solid");</script>
</body>
</html>

Output :


jQuery filters

The jQuery filter is used to filter out certain values from the object list based on certain criterion.

Uses of JQuery filter
The jQuery filter is used to filter out certain values from the object list based on certain criterion.
For example you can make a shopping cart website and display a list of products images in the main product display area. Then you can allow the user filter out the items based on some keywords. This way can make a nice gui for your application. You can get the data from server store in a list and then use the jQuery filter to filter out the data based on the user input.
Some of the key uses are given below :
  • It is very similar to selector in fact we can say that it is a type of selector to enhance the functionality of selector.
  • We can select filter according to their position.
  • We can select filter according to tag name.
  • We can select filter according to child, last-child ,nth child ,only child.
  • We can select filter according to their visibility.
  • We can select filter according to sibling, adjacent, or descendant etc.
The types of filters are listed detailed in next posts of this blog only ...

jQuery Selectors

           These selectors uses CSS syntax to allow page developer to easily identify the elements of page to operate upon with jQuery library methods. For using JQuery library most effectively , you must be familiar with  jQuery selectors.


Syntax pattern of jQuery selector :
$.(selector).methodName();
The selector is a string expression that identify the element on which the the method has to be implemented. For example :
$("p").click();
You can also hide the paragraph as follows :
$("p").hide();
You can also apply the CSS class to any element as :
$("p").addClass('box'); 

Types Of Selectors: 

Uses of basic CSS selector 

The basic selectors are known as 'find selectors' as they are used to find the element within the DOM.
Syntax:
$.(selector/Syntax).methodName();
Given below the uses of Basic CSS Selector according to "syntax" used :
SYNTAX DESCRIPTION 
* Selects all elements
E Selects all elements with tag name E.
E F Selects all elements with tag name F that are descendants of E
E>F Selects all elements with tag name F that are direct children of E.
E+F Selects all elements with tag name F that are immediately preceded by a sibling of tag name E.
E-F Selects all elements with tag name F that are  preceded by any sibling of tag name E.
E : has(F) Selects all elements with tag name E that have at least one descendant of tag name F.
E .C Selects all the elements E that have a class name C. Removing C Removing E is identical to *.C
E#i Selects all the elements E that have an id value of i. Omitting E is identical to *#i.
E[a] Selects all the elements E  that have an attribute 'a' of any value.
E[a=v] Selects all the elements E  that have an attribute 'a' whose value is exactly 'v'.
E[a^=v] Selects all the elements E  that have an attribute 'a' whose value starts with 'v'.
E[a$=v] Selects all the elements E  that have an attribute 'a' whose value ends with 'v'.
E[a*=v] Selects all the elements E  that have an attribute 'a' whose value contains 'v'.

Uses of Position Selectors


This selector select the elements according to their position in page. These selectors can be apply to any base selector.(it is denoted by B here). If it is omitted, it is assumed to be *.
Given below the uses of Position Selectors according to "syntax" used :
SYNTAX DESCRIPTION
B:first Selects the first element of element B
B:last Selects the last element of element B
B:first-child Selects all the elements from B that are first children.
B:last-child Selects all the elements from B that are last children.
B:only-child Selects all the element from B that are only children.
B:nth-child(n) Selects all the element from B that are n-th ordinal children. Starts at 1.
B:nth-child(odd/even) Selects all the element from B that are even or odd ordinal children. The first child is considered odd(ordinal1)
B:nth-child(Xn+Y) Selects the Y element from B after every Xth element of B.
B:even Selects the even elements of B.
B:odd Selects the odd elements of B.
B:gt(n) Selects the element after the nth element of B. Starts at 0.
B:lt(n) Selects the element before the nth element of B. Starts at 0.
B:eq(n) Selects the nth element defined with in B element.

Uses of jQuery Custom Selector :

This selector select the elements according to their type or some property. These selectors can be apply to any base selector.(it is denoted by B here). If it is omitted, it is assumed to be *.
Given below the uses of Custom Selector according to "syntax" used :
SYNTAX DESCRIPTION
B:animated Selects one of elements of B that are currently under the animated control of one of the jQuery animation method 
B:button Selects the elements of B of any button type.
B:checkbox Selects the elements of B of checkbox type.
B:enabled Selects the elements of B that are in enabled state.
B:file Selects the elements of B of file input type.
B:header Selects the elements of B of header type(H1 to H6).
B:hidden Selects the elements of B that are hidden.
B:image Selects the elements of B of image input type.
B:input Selects form input element from B. i.e. input, select,textarea,button.
B:not(f) Selects the elements from B that do not match the filter selector specified by f.
B:parent Selects the elements of B that are parents of non-empty element children
B:password Selects the elements of B of password type.
B:radio Selects the elements of B of radio input type.
B:reset Selects the elements of B of reset input type.
B:selected Selects the elements of B that are in selected state.
B:submit Selects the elements of B of submit input type.
B:text Selects the elements of B of text input type.
B:visible Selects the elements of B that are not hidden.
 

JQuery Introduction


Why JQuery:           
                  JQuery is great library for developing Ajax based application. jQuery is great library for the JavaScript programmers, which simplifies the development of web 2.0 applications.
                The jQuery library is providing many easy to use functions and methods to make rich applications. These functions are very easy to learn and even a designer can learn it fast. Due to these features jQuery is very popular and in high demand among the developers. You can use jQuery in all the web based applications irrespective of the technology.

Features Of JQuery:
             
Selection of DOM elements :
The jQuery selector provide us capability to select DOM elements so that we can add functionality to them using methods of jQuery. It is using CSS 3.0 syntax which provide us freedom to select one or more elements. Using CSS , you can select element by id, class and collaborate with events to increase it's functionality.
The wrapped set 
The selected elements reside inside a object known as wrapped set. It contain all the selected DOM elements, it has array like structure. You can traverse through this like an array and can select elements using index.
Events 
jQuery provide simplified event handling, You can easily bind and unbind events and for supported browsers it also provide a normalized event model due to this it is very easy to handle events.When any event occurs , it is called under the context of the event that triggered it.
Extensibility through plug-ins
The jQuery architecture provide us freedom to extend functionality using plug-ins . The plug-ins are easy to use and easy to clip with your page. You just need to set parameters to use these jQuery plug-ins and also need to include plug-in file. Some the main jQuery plug-ins are :
1.XML and XSLT tools
2.cookie handling
3.datagrids
4.drag and drop events.
5.modal windows
6.dynamic lists
7.webservices
8.Ajax helpers
9.even a jQuery-based Commodore 64 emulator.
Cross-browser support
In JavaScript, the DOM implementations for event handling vary considerably between browsers. Where as jQuery providing a normalized event model for all supported browsers that makes it very easy to handle events.
Ajax support
AJAX stands for Asynchronous JavaScript and XML . Using AJAX we can connect to database and also can fetch the data from the server's database without refreshing the page. JQuery  have very effective AJAX methods library to extend the functionality of AJAX.
Compatibility with languages
The jQuery script can be used with nearly all the web languages. Some of Frequently used languages with jQuery are given below:
 1.PHP
2.JSP
3.ASP
4.Servlet
5.CGI

How JQuery Works:

       
          Traditionally developer's are using Window.onload() function to initiate some action on page load. There is one drawback with this function. It does not fires until all the images including the advertisement banner are loaded. So, window.onload() can be painfully slow. The jQuery provides the solution for this problem. The $(document).ready(function(){}) solves the issue.
         It is fired once the Document Object Model is ready. So, you can use this to run any type of JavaScript to suite your business needs.
Here is the code that will display alert message once Document Object Model is ready:

$(document).ready(function(){
// Your code here...
alert("Hello");
});


This method will be called once Document tree is ready. Here you can add any JavaScript function. 


 Sample Example on JQuery:


<html>
<head>
<title>jQuery Hello World Alert box</title>
 
<script type="text/javascript"
src="http://ajax.googleapis.com/ajax/libs/jquery/1.6.1/jquery.min.js">

</script>

 
</head>
 <script type="text/javascript">
$(document).ready(function(){
$("#cl").click(function(){
alert("HELLO WORLD!");
});
});
</script>
<body>
<font color="red">CLICK BELOW BUTTON TO SEE ALERT BOX</font>
<br>
<br>
<button id="cl">Click Me</button>
</body>
</html>

Friday, 9 September 2011

Accesing The JSON Webservice with JQuery

    To call the Web Service from client-side, I have used JQuery’s ajax method. In JQuery’s ajax method, you need to set the request type to post, as an AJAX Web Service (by default) doesn’t allow methods to be called via the HTTP GET method (how to enable HTTP GET in a Web Service?). For your information, ASP.NET AJAX controls like UpdatePanel uses HTTP POST when sending asynchronous requests. Below is the JQuery method that will call the Web Service method.

$.ajax({
        type: "POST",
        data: "{'prefix':''}",
        url: "/YourWebService.asmx/MethodName",
        contentType: "application/json; charset=utf-8",
        dataType: "json",
        success: functionToCallWhenSucceed,
        failure: funcitonToCallWhenFailed
});
 
See the following Example...
Here I'm using the Webservice  earlier created in this blog...

<%@ Page Language="C#" AutoEventWireup="true" CodeFile="Default2.aspx.cs" Inherits="Default2" %>

<!DOCTYPE html PUBLIC "-//W3C//DTD XHTML 1.0 Transitional//EN" "http://www.w3.org/TR/xhtml1/DTD/xhtml1-transitional.dtd">

<html xmlns="http://www.w3.org/1999/xhtml">
<head id="Head1" runat="server">
    <title></title>
   
    <script type="text/javascript" src="http://ajax.googleapis.com/ajax/libs/jquery/1.6.1/jquery.min.js"></script>
     <script type="text/javascript">
         $(document).ready(function () {

             $("#btnsubmit").bind("click", function () {

                 var name = $("#txtname").val();

                 $("#query_results").empty();

                 $("#query_results").append('<table id="ResultsTable" class="AccountsTable"><tr><th>AccId</th><th>AccName</th></tr>');
              
                 $.ajax({

                     type: "POST",
                     url: "WebService.asmx/GetAccountdetailsByName",
                     data: "{'name':'" + name + "'}",
                     contentType: "application/json; charset=utf-8",
                     dataType: "json",

                     success: sucesscallback,
                     error: FailureCallBack

                 });
             })
         });
     

         function sucesscallback(msg) {
       
                         var c = eval(msg.d);

                         for (var i in c)
                          {

                             $("#ResultsTable tr:last").after("<tr><td>" + c[i][0] + "</td><td>" + c[i][1] + "</td></tr>");

                         }
                     }

                     function FailureCallBack(data) {
                         alert("Failure");
                     }
     </script>
</head>
<body>
    <form id="form1" runat="server">
    <div>
         <input type ="text" ID ="txtname" runat ="server" />
         <input type="button" ID ="btnsubmit" value ="submit" runat ="server" />
    </div>
    <div id="query_results">
    </div>
    </form>
</body>
</html>

Creating A Webservice which Returns JSON

What is JSON format?

         JSON is a lightweight data-interchange format. Like XML, it is human-readable, platform independent, and enjoys a wide availability of implementations. JSON is a subset of the object literal notation of JavaScript. Data represented in JSON can be parsed by JavaScript easily, so it is ideal for AJAX based web applications.

Why should you care about JSON?

If a Web Service returns XML data, then the data to be passed from the server to the client is larger than what it would be in the case of JSON. So, using JSON, we only need to pass fewer amounts of data. Also, XML parsing on client side is cumbersome and costly in the perspective of processing. If there’s another easier way, then why should not we use that?
Let’s assume the following XML data is returned by the Web Service.


<Product>
  <ProductID>1</ProductID>
  <ProductCode>p_1</ProductCode>
  <ProductName>a Product 1</ProductName>
</Product>
 
To parse data on the client-side, you’ll need to use JavaScript XML features.
On the other hand, if the Web Service returns JSON format, then the same data is represented as:
 
{"ProductID":1,"ProductName":"a Product 1"}
 

Changes in Web Service to make it JSON enabled:

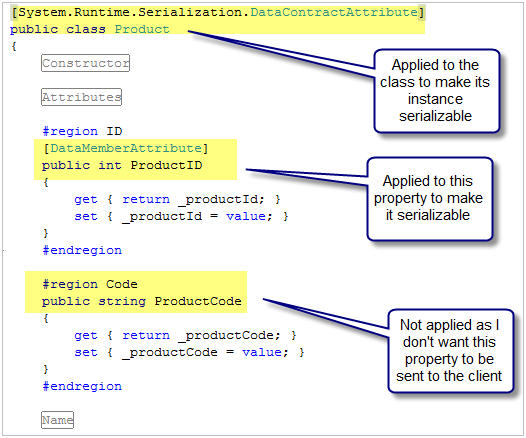
1. Make The Object Serializable:

For serializing our objects in JSON, we’ll use a data contract serializer, System.Runtime.Serialization.Json.DataContractJsonSerializer. There’s another serializer called System.Web.Script.Serialization.JavaScriptSerializer which also can be used for JSON serialization, but this class was deprecated in .NET Framework 3.5 and undeprecated again in .NET Framework 3.5 SP1. Both JavascriptSerializer and DataContractJsonserializer have their own benefits. 


ClassChanges.jpg

2. Prepare the web service method to return JSON formatted data:

The Web Service method which will return the JSON data needs to apply the attribute [ScriptMethod(ResponseFormat = ResponseFormat.Json)]return JSON formatted data. Also, the Web Service’s method return type will always be string. Which will tell the client that the Web Service will

WebMethodChanges.jpg


See the following sample Example Program...


using System;
using System.Collections.Generic;
using System.Linq;
using System.Web;
using System.Web.Services;
using System.Web.Script.Serialization;
using System.Web.Script.Services;
using System.Data;
using System.Data.SqlClient;
/// <summary>
/// Summary description for WebService
/// </summary>
[WebService(Namespace = "http://tempuri.org/")]
[WebServiceBinding(ConformsTo = WsiProfiles.BasicProfile1_1)]
// To allow this Web Service to be called from script, using ASP.NET AJAX, uncomment the following line.
[System.Web.Script.Services.ScriptService]
public class WebService : System.Web.Services.WebService {

    public WebService () {

        //Uncomment the following line if using designed components
        //InitializeComponent();
    }

    [WebMethod]
    public string HelloWorld() {
        return "Hello World";

    }

                         /* The Solution starts from here*/

    [WebMethod(Description = "Gets the Account Details.")]

    [ScriptMethod(ResponseFormat = ResponseFormat.Json)]

    public string GetAccountdetailsByName(string name)
    {

        SqlConnection objConnection = new SqlConnection("Data Source=WKS98\\SQLEXPRESS;Initial Catalog=sample;Integrated Security=True");

        SqlCommand objCommand = new SqlCommand("SELECT * FROM accounts WHERE AccName LIKE  '%" + name + "%'  ORDER BY AccountID;", objConnection);

        DataSet objDataSet = new DataSet();

        SqlDataAdapter objDataAdapter = new SqlDataAdapter(objCommand);

        objDataAdapter.Fill(objDataSet, "names");

        objConnection.Close();


        // Create a multidimensional jagged array

        string[][] JaggedArray = new string[objDataSet.Tables[0].Rows.Count][];

        int i = 0;

        foreach (DataRow rs in objDataSet.Tables[0].Rows)
        {

            JaggedArray[i] = new string[] { rs["AccountID"].ToString(), rs["AccName"].ToString() };

            i = i + 1;

        }


        // Return JSON data

        JavaScriptSerializer js = new JavaScriptSerializer();

        string strJSON = js.Serialize(JaggedArray);

        return strJSON;

    }    
      
}

Tuesday, 6 September 2011

Master Pages in ASP.Net

Master Pages

         Master pages allow you to create a consistent look and behavior for all the pages (or group of pages) in your web application.
          A master page provides a template for other pages, with shared layout and functionality. The master page defines placeholders for the content, which can be overridden by content pages. The output result is a combination of the master page and the content page.
The content pages contains the content you want to display.
When users request the content page, ASP.NET merges the pages to produce output that combines the layout of the master page with the content of the content page.
                    
           A master page is an ASP.NET file with the extension .master (for example, MySite.master) with a predefined layout that can include static text, HTML elements, and server controls. The master page is identified by a special @ Master directive that replaces the @ Page directive that is used for ordinary .aspx pages. The directive looks like the following.

<%@ Master Language="C#" CodeFile="MasterPage.master.cs" Inherits="MasterPage" %>

 The Following Figure illustrate about Master Pages and Content Pages...


Sample Example


Step 1: Creating a Master Page

Create a New ASP.Net empty website,
        Next, add a master page to the site in the root directory by right-clicking on the Project name, choosing Add New Item, and selecting the Master Page template. Note that master pages end with the extension .master. Name this new master page Site.master and click Add.
Add a Master Page Named Site.master to the Website

For Creating the following sample layout :
The Master Page Defines the Markup for the Top, Left, and Bottom Portions
1. first Create A style sheet like this name it as Styles.css:

 #topContent { text-align: right; background-color: #600; color: White; font-size: x-large; text-decoration: none; font-weight: bold; padding: 10px; height: 50px; }

2.
To achieve the site layout shown in Figure  start by updating the Site.master master page so that it contains the following declarative markup:
<%@ Master Language="C#" AutoEventWireup="true" CodeFile="Site.master.cs" Inherits="Site" %><!DOCTYPE html PUBLIC "-//W3C//DTD XHTML 1.0 Transitional//EN" "http://www.w3.org/TR/xhtml1/DTD/xhtml1-transitional.dtd"><
<
html xmlns="http://www.w3.org/1999/xhtml">head runat="server"><title> Master Pages Sample Example</title><asp:ContentPlaceHolder id="head" runat="server"></asp:ContentPlaceHolder><link href="Styles.css" rel="stylesheet" type="text/css" /></
<body><form id="form1" runat="server"><div id="topContent"><a href="Default.aspx">Master Pages Tutorials</a></div>
<div id="mainContent"><asp:ContentPlaceHolder id="MainContent" runat="server"></asp:ContentPlaceHolder></div>
<div id="leftContent"><asp:ContentPlaceHolder id="left" runat="server"></asp:ContentPlaceHolder><p style="text-align: center;"><asp:Label ID="DateDisplay" runat="server"></asp:Label></p></div><div>
<h3>Lessons</h3> <ul><li>TODO</li></ul>
<h3>News</h3> <ul><li>TODO</li></ul><a href="Default2.aspx">for Next</a></div>


</
</form>body></html>
head>

Step 2: Creating Associated Content Pages

With the master page created, we are ready to start creating ASP.NET pages that are bound to the master page. Such pages are referred to as content pages.
Let's add a new ASP.NET page to the project and bind it to the Site.master master page. Right-click on the project name in Solution Explorer and choose the Add New Item option. Select the Web Form template, enter the name Default.aspx, and then check the "Select master page" checkbox as shown in Figure 7. Doing so will display the Select a Master Page dialog box (see Figure 8) from where you can choose the master page to use.
.
Figure 07: Add a New Content Page (Click to view full-size image)
Figure 08: Select the Site.master Master Page (Click to view full-size image)
As the following declarative markup shows, a new content page contains a @Page directive that points back to its master page and a Content control for each of the master page's ContentPlaceHolder controls.


For Clear understanding I'm going to add Two web forms one is Default.aspx and Default2.aspx

After adding webform if you switch to design view then you will findout the contentplace holders there you can  write any information....
The two webforms design will be like ...

For Default.aspx

@ Page Title="" Language="C#" MasterPageFile="~/Site.master" AutoEventWireup="true" CodeFile="Default.aspx.cs" Inherits="_Default" %><
<
</
<
asp:Content ID="Content1" ContentPlaceHolderID="head" Runat="Server">p>This is First page... </p>asp:Content>asp:Content ID="Content2" ContentPlaceHolderID="MainContent" Runat="Server"><p style="font-size: x-large; font-weight: bold; font-style: italic; font-variant: normal; text-transform: none; color: #FF0000">About The Author:
<
</p>p>
author of this page is ...........
</
<
&nbsp;&nbsp;&nbsp;&nbsp;&nbsp;&nbsp;&nbsp;&nbsp;&nbsp;&nbsp;&nbsp;&nbsp;&nbsp; Hi the &nbsp;</p>asp:Content>asp:Content ID ="Content3" ContentPlaceHolderID="left" runat="server"><p>The Date and Time is&nbsp; ...</p> </asp:Content>
<%

For Default2.aspx
<%@ Page Title="" Language="C#" MasterPageFile="~/Site.master" AutoEventWireup="true" CodeFile="Default2.aspx.cs" Inherits="Default2" %><
<
</
<
asp:Content ID="Content1" ContentPlaceHolderID="head" Runat="Server">p>This is second page...</p>asp:Content>asp:Content ID="Content2" ContentPlaceHolderID="MainContent" Runat="Server">
 Hi this is second web form for same master Main content......</p>asp:Content>asp:Content ID="Content3" ContentPlaceHolderID="left" Runat="Server"><p style="font-family: Calibri; color: #FF0000">Hi this is second web form for same master left content .....</p><p style="font-family: Calibri; color: #FF0000">&nbsp;<asp:Label ID="Label1" runat="server" Text="Label"></asp:Label>&nbsp;&nbsp;&nbsp;&nbsp;&nbsp;&nbsp;&nbsp;&nbsp;&nbsp;
&nbsp;&nbsp;&nbsp;&nbsp;&nbsp;&nbsp;&nbsp;&nbsp;&nbsp;&nbsp;&nbsp;&nbsp;&nbsp;&nbsp;

&nbsp;<asp:Button ID="Button1" runat="server" onclick="Button1_Click" Text="Button" />
</
</p>asp:Content> 
</
<
<p style="color: #008000; font-family: 'Bell MT'; text-decoration: blink">

Next, create a Page_Load event handler for the master page and add the following code:

void Page_Load(object sender, EventArgs e)DateTime.Now.ToString("dddd, MMMM dd");
protected
{
DateDisplay.Text =
}

Then Debug the Application and Observe the Output....
Here in Master page only you desing the simple layout and you use this in two webforms by using Content Place holder...